The topic of zeroing comes up quite frequently, and to ease explaination I wrote the following to more easily illustrate my preference and the reasons why.
You might want to take a look at Molon’s thread about zeroing:
AR-15 Zeros and Trajectories
to get better acquainted with the nuances in the path of trajectory. Be advised, how something looks in pure data form is much different than real life application.
Recently, Larry Vickers put his thoughts on it in his “ask the SME” section here at M4:https://www.m4carbine.net/showthread.php?p=1329607#post1329607
Anyway, without futher ado, here it is:
The Zen of the 100 Yard Zero
Concept.
I find that a 100 yard zero is the easiest, most intuitive, fastest zero for rapid engagement of human threats at the most applicable envelope of 5.56 employment (0 to 300 meters) with the use of common optics. I use a modification of the 100 yard zero for iron sights, as the sighting capability of irons is different than that of an “open view” optic, since the front sight post will make hold-over at longer ranges a bit more difficult when focusing on the front sight.
First things first, this is based on the use of small caliber, high velocity cartridges (5.56mm or similar) fired from an AR type weapon (or any that place the line of sight through the optic at 2 to 3.5 inches above the bore). Should you be somewhere that measures in meters, 100 meters is effectively identical for the purposes of zeroing.
When the optic is adjusted to place point of impact at the point of aim at 100 yards it greatly simplifies close-range engagements. The trajectory of the bullet will never rise higher than the line of sight, and the path from muzzle to the zero distance will be “flatter” than any other zeroing scheme. What this means to the shooter is that hold-overs for close range shots will be more similar across more distances than any other trajectory. The differences in trajectory are lost on many that do not adhere to high precision standards. Hitting an 8" circle with consistency at 3 to 25 yards is not difficult; hitting a 3" circle across that range spectrum is a bit more technical in nature. The ability to consistently hit that 3" circle is heavily dependent on the shooter being intimately familiar with the amount of hold-over his sights require to place the shot where he wants it. A good shooter that knows his hold-overs will be able to achieve those hits, regardless of zeroing method. The 100 yard zero enables the shooter to use more broadly defined hold-overs with a lower necessity to accurately gauge distance.
With M193 from a 16" barrel with a 2.8" line of sight over bore (common lower 1/3 cowitness), here are what hold-overs commonly come out to:
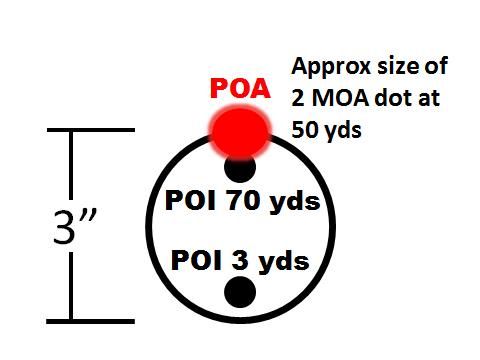
Holding at the top of a 3" circle will place the round in the lower 1/3 of the circle at 3 yards, and in the upper 1/3 at 70 yards.
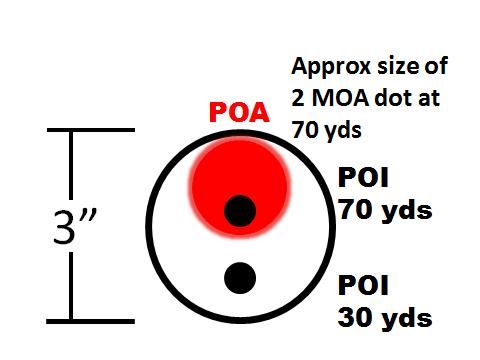
Holding in the upper 1/3 of the 3" circle (1 inch high) will place shots within the 3" circle from 30 yards to around 200 yards (though most shooter/weapon/ammo combinations will not be able to maintain that level of precision past 75 yards or so).
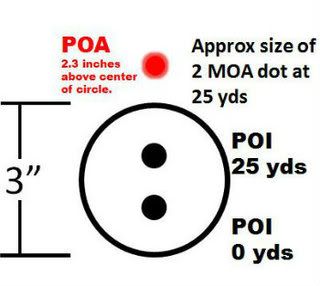
One can be more precise with the 3 to 50, of course. Giving the shooter a 1/2 inch leeway in trajectory, here are what the holds look like:
2.3" high = 0 to 25 yards (2.8 inches to 1.8 inches strike of round below line of sight)
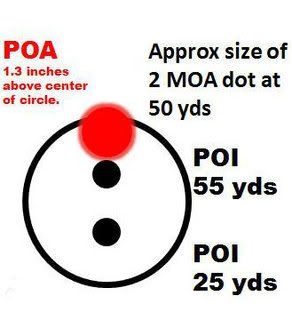
1.3" high = 25 yards to 55 yards (1.8 inches to 0.8 inches below line of sight
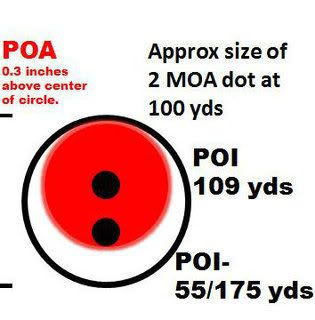
POA/POI = 50 yards to approx 175 yards (1 inch low, zero from 90 to 140, and dropping to 1" low at 175)
Here’s what holds with the same 1/2 inch leeway look like with a 50 yard zero (similar to a 200 yard zero):
2.3" high = 0 to 16 (2.8 inches to 1.8 inches low)
1.3" high = 16 to 34 (1.8 inches to .8 inches low)
0.3" high = 34 to 55 yards (0.8 inches low to 0.2 inches high)
0.7" low = 55 yards to 80 yards (0.2" high to 1.2" high)
1.7" low = 80 yards to 120 yards (1.2" high to 2.2" high)
2.7" low = 120 yards to approx 190 yards (2.2" high, to max of about 2.5", back down to 2.2" high)
So, it should be pretty easy to see what zero requires the least amount of thought to get to work with the same level of precision. Further, an error in distance estimation (which is going to be pretty hasty when under stress/facing a lethal threat) is less of an issue with the more gradual rise of a 100 meter zero.
Mid-range work with a 100 yard zero does not suffer once the shooter becomes accustomed to drops and holds.
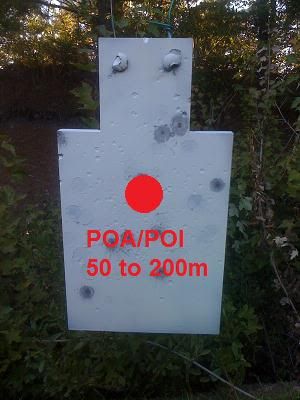
For all but the smallest of targets, the user of a 100 yard zero can hold POA/POI out to 200 yards (less than 3" of drop).
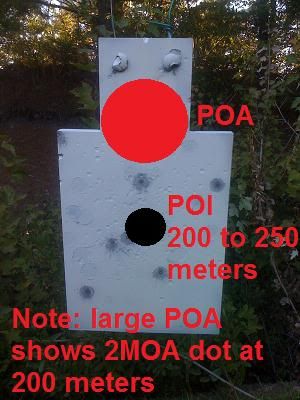
From 200 to 250 yards, you will have less than 7 inches of drop.
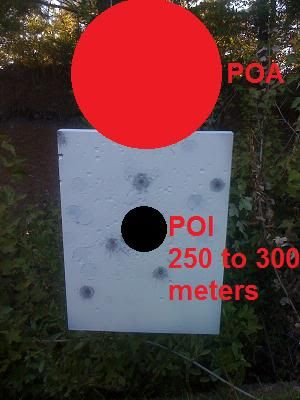
At 300 yards you will see about 12" of drop (about 1 mil for those shooting mil-based reticles).
Shooting past 300 or at targets smaller than 8" circles will require the shooter to become more intimately familiar with firing conditions.
Iron Sights.
When it comes to irons I prefer to zero 2 inches high at 100 yards. This is primarily to maintain awareness of the target at distances that would otherwise obscure the target with the front sight. Since iron sights require the shooter to focus on the front sight for accurate placement of shots, it is difficult to see what to shoot at as distance increases. The trajectory is very similar to the 50/200 zeroing scheme, but a 50 yard/meter zero still leaves a large margin for possible error in adjustment; zeroing at 200 is extremely time-consuming unless the target can provide rapid feedback without requiring the shooter to cover 200 meters to check his groups, and wind begins to make a distinct effect on the bullet at 200, which can cause a lot of issues with deviation adjustment.
Execution.
Zeroing at 100 yards (regardless of POI in relation to POA) removes a lot of “slop” in adjustments, virtually all sight adjustments are referenced at 100 yards/meters (which makes adjustments easier), wind only slightly effects the POI, and it gives the shooter time to hone fundamentals at a distance relevant to the prone position.
Attempting to zero at distances closer than 100 yards in an attempt to achieve a 100 yard zero without actually shooting at 100 yards is no substitute for the real thing. Zero can only be truly achieved by shooting at the actual distance.
There is much gnashing of teeth about zeroing targets. I prefer to use simple targets that have multiple purposes. The B8 pistol target reface is perfectly acceptable for zeroing, though a target with an easily identified center and a grid pattern relevant to the sighting system adjustments makes things a little easier. For iron sights and 1X optics I like a 6 to 8 inch circle for zeroing and confirmation purposes. For optics with a more traditional crosshair I prefer a target with an “X” pattern, which makes holding on the center of the target easier. The idea is to use the smallest target possible that the shooter can consistently find center while using the sighting system. I used to use black 4” circles for 2 MOA dot optics, but after several serious cornea scratches none of my Aimpoints appear circular enough to use such small targets, thus my preference for larger circles. When properly focusing on the front sight tip when using irons, anything smaller than ~6 inches will be difficult to positively identify and center the sight on at 100 meters: thus my preference for larger targets for them as well.
Simply because I do not accept a zero fired closer than 100 yards to be valid does not mean that one should jump all the way back to 100 yards for initial zeroing. With an unzeroed optic I will begin the process at 25 yards, and simply adjust my group to be approximately 1.5 inches below my point of aim. I will rarely fire more than two groups of three rounds each, as I simply need to “get on paper” at 100 so I can get on with achieving a “real” zero. There is no need for specialized targets or fine-tuning of the sights at 25 yards. Just get close and move back to 100 as soon as possible, as the 100 yard walk cuts into time very rapidly.
Confirming zero:
Once you believe that you are zeroed, you need to confirm.
Slight changes in body position will lead to a shift of the natural point of aim (NPA), which can cause inconsistencies and shifts in the group down-range. We want to iron out those possible errors in sighting as they relate to our zero, and that can only be done by observing several overlaid groups.
Here’s how I do it:
The shooter fires four groups of five rounds each. Between each group the shooter stands up, moves around a bit, and then reassumes the prone position and fires the next five round group. Before commencing firing, and for each and every shot of the group, the shooter must have the discipline to ensure that his NPA is correct.
Once the 20 round group is complete, head down-range and check the group. Do not expect it to be as tight as the five round groups used for zeroing. You WILL throw a shot or two. The important thing is determining the POI of the bulk of your shots, and to make whatever minor corrections are necessary to put that group into the POA (target center).
The most common error in zeroing is shooting too fast or too slow. The shooter should manipulate the trigger the same way as if firing to hit the center of the zeroing target in as little time as necessary. Changes in trigger control will equate to changes in POI.
Conclusion:
The 100 yard zero with common optics works. It permits the shooter to focus on the task at hand instead of worrying about hold-over/hold-under at the distances at which rapid action will save lives. In the quest for simplification without capability loss, the 100 yard zero rules the day.
I am completely disinterested in forcing others to adopt my zeroing concept or in telling anyone that what they are currently doing is wrong. I am simply providing hard-earned data to those that are interested in pulling the highest possible performance out of their equipment.